BIOS and UEFI explained, all you need to know about
BIOS and UEFI are two of a kind, but completely different from each other. They serve one major purpose: booting the machine and they do it in different ways and with different options. Without them, all your hardware and the very machine you’re reading this article on, wouldn’t even start. But what are the differences? And why are they mutually exclusive?
What is BIOS?
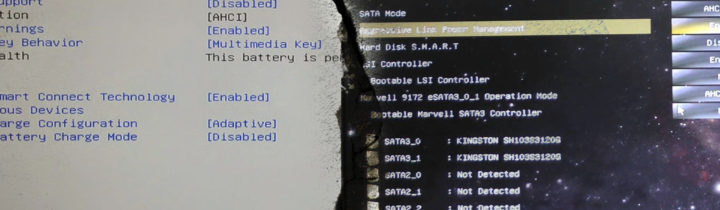
The Basic Input Output System is the older standard and dates back to old IBM-compatible computers. For almost twenty years, the BIOS has been a de facto standard in common computer implementations. The BIOS is a special software called firmware that is stored in a special chip soldered on the motherboard called ROM (usually EEPROM these days). When you press the power button, the BIOS is the first software that is run on the machine. This software is mostly responsible for three things:
- Performing POST: (Power-On Self-Test) in this phase the BIOS checks if the component installed on the motherboard are functioning (mostly CPUs and RAMs).
- Providing Basic IO: so that essential peripherals such as the keyboard, the monitor and serial ports can operate to perform basic tasks.
- Booting: this step is where all the magic happens, the BIOS tries to boot from the devices connected (SSDs, HDDs, PXE, whatever) in order to provide a better-suited interface (usually an Operating System) to fully make use of the hardware components.
As you can see the BIOS is pretty much a fundamental brick of the boot process and without it you wouldn’t be able to “start” the computer. A BIOS is usually associated with the motherboard and is mostly visible during the first seconds after powering the computer. When you see a great logo from the motherboard/computer manufacturer and (usually) hear beeps, the BIOS is at work.
What the BIOS can and can’t do
BIOS perform quite a strict role and it might appear to you that they always do the same thing. In the past, BIOS were written on plain ROMs (or difficult-to-erase ROMs), without the possibility to write or to erase the ROM, the software couldn’t be programmed or upgraded. Nowadays, BIOS can be updated to support newer hardware/features and can be programmed to perform specific tasks such as:
- Turning on/off USB ports, Serial ports or IDE/SATA ports;
- Over/Underclocking CPUs/RAMs frequencies;
- Regulate motherboard fan controllers;
Although BIOS can perform these task well, they still operate in the 16-bit realm and as such they are limited. The most prominent limitation can be observed when using 2TB+ disks. Most BIOS can only boot from an MBR-partitioned disks, but MBR itself supports up to 2TB partitions meaning it won’t recognize the disk past that. Well there’s GPT that solves the problem of disks bigger than 2TB, but wait… most BIOS can’t boot from GPT. This means that if you have a 3TB disk you have two choices:
- Use MBR partitioning: you will be able to boot an Operating System but the system will be presented with 2TB only.
- Use GPT partitioning: you will not be able to boot.
The choice is obvious. But how can a disk larger than 2TB be used as a boot disk?
UEFI the BIOS successor
The Unified Extensible Firmware Interface aims to resolve what BIOS could not. UEFI itself is the second version (2.*), the former being EFI (1.*). If you bought a computer after 2010, you will probably have a UEFI instead of a BIOS. You read correctly, BIOS and UEFI do the same thing, but they are pretty different in how and what they do. A UEFI can (in addition to what a BIOS can):
- Boot from disks larger than 2TB using GPT (assuming the operating system supports both).
- Provide the user with a graphical user interface which is easier to use than old terminal user interfaces of BIOS.
- Provide support for mouse devices (BIOS can rarely do this).
- Boot securely using a chain-of-trust. (More later on secure boot).
- Network boot (although most BIOS can do that, that’s not a given).
- Provide a modular interface which is independent from the CPU architecture.
- Provide a modular interface for applications and devices based on EFI drivers (commonly called EBCs, EFI Byte-Code).
Do I have a BIOS or a UEFI?
Unless you read your motherboard’s manual, there is no precise way to tell if you’re using a BIOS or a UEFI. But there are a few signs:
- UEFIs usually have pretty, coloured interfaces.
- In UEFI you can usually use your mouse.
- If you bought the computer/motherboard after 2010, chances are you have a UEFI system.
UEFI and boot modes
With the inception of UEFI a new boot mode was born, leaving us with two modes:
- UEFI mode: the newer boot mode, requires a separate partition (called EFI partition) where bootloaders are stored.
- BIOS mode: the old way used by the BIOS, the bootloader would be stored on the disks (usually at the beginning of the disk).
This created a lot of confusion, especially among tech enthusiasts. Before UEFI the only way to install an operating system was the BIOS mode, but with UEFI, the UEFI mode was the new standard and the selected default. This, however, messed with Operating Systems: Operating System installed in BIOS mode can’t be booted using UEFI mode and vice versa. This means that if you have installed an operating system in BIOS mode you can’t boot in UEFI mode without modifying the installation or reinstalling the whole system, the same applies with a UEFI installation and a BIOS boot. That’s why many UEFI now support the so-called Legacy Mode.
UEFI and Legacy Mode
Put it simply, the Legacy Mode is UEFI operating as if it was a BIOS. You will lose most of the benefits the UEFI such as the Secure Boot or the Fast Boot, but will retain the graphical user interface. The only difference is that the UEFI will be able to boot from MBR disks (hence without the required EFI partition) and will be able to boot non-UEFI installations. Most motherboards support Legacy Mode nowadays.
I have a UEFI, was my operating system installed in UEFI or Legacy mode?
This can be determined using the Operating system capabilities:
- Windows: Use the Disk Management tool to check if a “EFI System Partition” exists on the disk where Windows is. If there is one, the system was installed in UEFI mode, if not it was installed in Legacy mode.
- Linux: check if /sys/firmware/efi exists, if it does the system is installed in UEFI mode.
UEFI and Secure Boot
One of the most discussed features is the so-called Secure Boot (sometimes called Trusted Boot), the secure boot was born to ensure a more secure boot than the past. By denying the execution of unsigned code, Secure Boot enforces protection against malwares that operate in the pre-boot environment. This feature, however, had a negative effect on Linux users and vendors. To be able to boot an operating system, the same (more precisely the bootloader) had to be signed by a known key, which had to be recognized by the UEFI. When the first UEFI implementations started shipping it became clear that most Linux vendors weren’t prepared for this inception. Only a few vendors (namely Canonical, SUSE and Red Hat) could sign their operating system to work with Secure Boot. For a short time before UEFI, a fear that hardware vendors tied to Microsoft would enforce Secure Boot without the possibility to turn it off started spreading. Nowadays most UEFIs (albeit not every one) allow turning off Secure Boot. This enables a less-secure boot but allows unsigned operating systems to be booted.
Fast Boot? Quick Boot? Ultra Fast Boot?
All these names are vendor-specific ways to say “boot Windows faster“. These technologies use cache and hibernation files in order to produce a faster boot. This is usually so fast that the user won’t even see the POST screen or be able to boot from USB. Fast boot is a mechanism supported by Windows only.
- 2020 A year in review for Marksei.com - 30 December 2020
- Red Hat pulls the kill switch on CentOS - 16 December 2020
- OpenZFS 2.0 released: unified ZFS for Linux and BSD - 9 December 2020


where’s the rest of the article ?
Hello Jonathan, what do you refer to? I can see the whole article.