How to set up a Virtualization Host using KVM on CentOS 8.x
Nowadays when Virtualization and Linux are in the same sentence, KVM is sure to appear too. Ever since its inception it has become the de-facto Linux virtualization standard dethroning Xen from its towering position. With this tutorial you will learn how to set up a Virtualization Host on CentOS 8.x in a matter of few seconds.
KVM, Xen and the Linux server
KVM is included in the mainline Linux kernel since 2007 which is a major advantage over Xen which requires a different Kernel. Although you might imagine KVM is the hypervisor itself, it is just a part of it, as a matter of fact it is just an interface allowing hardware-assisted virtualization. Behind the scenes, the heavy lifting is performed by another great software: QEMU. When referring to KVM it is usually implied QEMU+KVM.
Virtualization, KVM, QEMU, Libvirt and CentOS
This paragraph explains what components are used in this process and the terminology associated to them. If you do not know what virtualization is I highly suggest you to read this: What is a Virtual Machine?
- Virtualization is the ability to create a virtual copy of the physical hardware to simultaneously run a software (usually an operating system) different from the one from the physical machine. The virtual copy is called virtual machine and it looks just like a physical machine, with the difference it is, in fact, virtual.
- KVM is a kernel module that exposes the /dev/kvm interface that can be used to perform hardware-assisted virtualization. This enables virtual machines to leverage fast CPU instructions to perform virtualization.
- QEMU is a hosted hypervisor that emulates physical hardware such as CPU and network interfaces.
- QEMU+KVM (sometimes written as QEMU/KVM) is the use of KVM associated with QEMU. QEMU still emulates the hardware but also leverages KVM to execute the guest operating system.
- Libvirt is a virtualization API capable of managing QEMU+KVM to provide higher level functions such as storage and network management.
KVM supported Guest operating systems
- Red hat family:
- Red Hat Enterprise Linux
- CentOS
- Fedora
- SUSE family:
- SLES
- OpenSUSE
- Debian family:
- Debian
- Ubuntu
- Mint
- BSD family:
- FreeBSD
- OpenBSD
- NetBSD
- DragonflyBSD
- Windows family:
- Windows 7/8/10
- Windows server 2008/2012/2016
- Windows Vista
- Windows XP
You can find a good list of supported guest operating systems on the official site. Although the list is official, there are many more supported guest operating systems than listed.
Verifying the requirements
In order to use KVM on CentOS 7.x you will need to have a CPU supporting hardware-assisted virtualization. You can simply verify this requirement by issuing the following command in a terminal:
# grep -E '(vmx|svm)' /proc/cpuinfo
This command will return a value if your CPU supports hardware-assisted virtualization regardless if you’re using an Intel or AMD CPU. If you don’t get an output, you might have to tweak your BIOS/UEFI and enable VT-x or AMD-v. If you can’t manage to find and enable that option in probably means your CPU doesn’t support hardware-assisted virtualization. This means you won’t be able to use KVM but you can still use QEMU. Using QEMU without KVM sensibly slows down guest operating systems.
Installing KVM (and QEMU and Libvirt)
Although the whole virtualization ecosystem might look overly-complex and complicated, installing it is actually pretty simple and can be done in one command:
# yum install qemu-kvm qemu-img virt-manager libvirt libvirt-client virt-install virt-viewer dejavu-lgc-sans-fonts
This will install QEMU+KVM, Libvirt and various utilities used to manage virtual machines.
Starting libvirt
In order to start using Libvirt utilities such as Virt Manager you will first need to start and enable Libvirt:
# systemctl enable --now libvirt
These commands will start the libvirt service and enable it at boot.
Configuring network
Now you will probably want to use your physical host interface as bridge, to do so you will need to configure IP forwarding on your physical host:
# echo "net.ipv4.ip_forward = 1" | tee /etc/sysctl.conf
# sysctl -p
Managing Libvirt graphically: Virt-manager
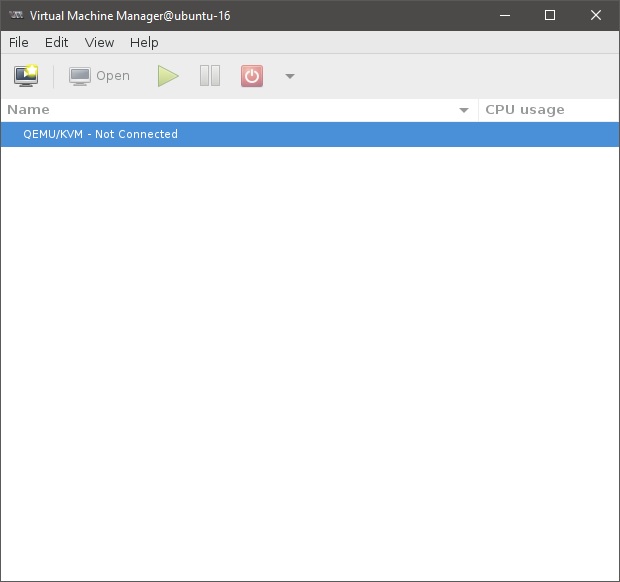
The simplest way to start using KVM for beginners is the Virtual Machine Manager (virt-manager) that you installed. To open it just click on your application menu entry or issue virt-manager inside a terminal. When you start the Virtual Machine Manager you will see this screen, everything you need for your virtualization needs can be found here. Remember: virt-manager needs elevated privileges to access the hypervisor (or alternatively that your user is in the libvirt group).
Conclusion
You now know what the relationship between QEMU, KVM, Libvirt is and know what each component does. You are now able to install install a simple virtualization environment on any machine that supports it and that is running CentOS 7. In the end, you also know how to turn on packet forwarding through your machine and the basics of Virtual Machine Manager, a fundamental GUI program to carry out virtualization tasks.
In the next tutorials you will learn how to manage Virtual Machines using both Virtual Machine Manager and its command line equivalent: virsh.
- 2020 A year in review for Marksei.com - 30 December 2020
- Red Hat pulls the kill switch on CentOS - 16 December 2020
- OpenZFS 2.0 released: unified ZFS for Linux and BSD - 9 December 2020


Recent Comments