NextCloud is a Dropbox-like solution for self-hosted file sharing and syncing. Installing NextCloud 12 on CentOS is quite simple. Whether you want to backup, have file-syncing or just have a Google Calendar alternative, this guide is for you.
Newer version!
There is a newer version of the software and a newer version of this guide available:
What is NextCloud? Is it like a “cloud”?
If you stumbled here by chance and don’t know what NextCloud is, here is an article explaining its principal features and advantages/disadvantages. In this other article you can find NextCloud 12 new features. To tell you the truth, NextCloud is a SaaS cloud, if you want to know more about cloud types you can read this article.
In this article we will cover the installation of the server (not the client).
Step1: Install software
Important
I take absolutely NO responsibility of what you do with your machine; use this tutorial as a guide and remember you can possibly cause data loss if you touch things carelessly.
The first step in order to install NextCloud 12 is to install a web server and PHP. Since CentOS 7 ships with PHP 5.4 by default but NextCloud 12 requires at least PHP 7 we’ll also be installing PHP 7 from a third-party repository. The following procedure will install apache as webserver. Input the commands one by one to avoid errors!
CentOS 7
If you’d rather use PHP 7.1, you can follow this tutorial: how to install PHP 7.1 on CentOS 7.
Warning!
If you decided to use PHP 7.1 rather than PHP 7.0 using the past tutorial, replace each instance of php70w with php71w in all the successive commands.
Open a terminal and input the following commands:
# yum install epel-release
# rpm -Uvh https://mirror.webtatic.com/yum/el7/webtatic-release.rpm
# yum install httpd php70w php70w-dom php70w-mbstring php70w-gd php70w-pdo php70w-json php70w-xml php70w-zip php70w-curl php70w-mcrypt php70w-pear setroubleshoot-server bzip2
Step 2: Database selection
Now that you got the software, you need to choose a database that will support the installation. You have three choices:
- SQLite: is a single-file database. It is suggested only for small installations since it will slow NextCloud down sensibly.
- MariaDB/MySQL: are popular open source databases especially amongst web developers. It is the suggested choice.
- PostgreSQL: a popular enterprise-class database. More complicated than MySQL/MariaDB.
Now, this choice won’t really alter the functionality of NextCloud (except if you use SQLite), so pick whatever you know best. If you’re unsure pick MariaDB/MySQL.
SQLiteMySQL/MariaDBPostgreSQL
No additional steps are required if you choose SQLite.
Install the software:
# yum install mariadb-server php70w-mysql
Start (and enable at boot) the service:
# systemctl start mariadb
# systemctl enable mariadb
Next step is to configure the database management system. During the configuration you will be prompted to choose a root password, pick a strong one.
# mysql_secure_installation
Now you need to enter the database (you will be asked the password you just set):
$ mysql -u root -p
Now that you are in create a database:
CREATE DATABASE nextcloud;
Now you need to create the user that will be used to connect to the database:
CREATE USER 'nc_user'@'localhost' IDENTIFIED BY 'YOUR_PASSWORD_HERE';
The last step is to grant the privileges to the new user:
GRANT ALL PRIVILEGES ON nextcloud.* TO 'nc_user'@'localhost';
FLUSH PRIVILEGES;
When you’re done type Ctrl-D to exit.
Install the software:
# yum install postgresql postgresql-server php70w-pgsql
Run the setup:
# postgresql-setup initdb
Start (and enable at boot) the service:
# systemctl start postgresql
# systemctl enable postgresql
Now you need to enter the database:
$ sudo -u postgres psql
Now that you are in create a database:
CREATE DATABASE nextcloud;
Now you need to create the user that will be used to connect to the database:
CREATE USER nc_user WITH PASSWORD 'YOUR_PASSWORD_HERE';
The last step is to grant the privileges to the new user:
GRANT ALL PRIVILEGES ON DATABASE nextcloud to nc_user;
When you’re done type \q and press enter to exit.
Warning: You may experience difficulties in authenticating NextCloud with PostgreSQL since the local authentication method is set to ident by default. If you want to change it keep reading.
The configuration file for PostgreSQL is a file located in /var/lib/pgsql/data/pg_hba.conf . Open it with your favourite editor and look for the marked line:
# TYPE  DATABASE        USER            ADDRESS                 METHOD

# "local" is for Unix domain socket connections only
local   all             all                                     peer
# IPv4 local connections:
host    all             all             127.0.0.1/32            ident
# IPv6 local connections:
host    all             all             ::1/128                 ident
# Allow replication connections from localhost, by a user with the
# replication privilege.
#local   replication     postgres                                peer
#host    replication     postgres        127.0.0.1/32            ident
#host    replication     postgres        ::1/128                 ident
Replace ident with md5 on that line and restart PostgreSQL:
# systemctl restart postgresql
Step 3: Install NextCloud
This step involves getting the software and configure Apache to run it.
CentOS 7
With these step we download the software and extract it:
# cd /var/www/html
# curl -o nextcloud-12-latest.tar.bz2 https://download.nextcloud.com/server/releases/latest-12.tar.bz2
# tar -xvjf nextcloud-12-latest.tar.bz2
# mkdir nextcloud/data
# chown -R apache:apache nextcloud
# rm nextcloud-12-latest.tar.bz2
Now we need to create a new file in /etc/httpd/conf.d/nextcloud.conf . Feel free to use whatever editor you feel comfortable with and add the following lines:
Alias /nextcloud "/var/www/html/nextcloud/"

<Directory /var/www/html/nextcloud/>
  Options +FollowSymlinks
  AllowOverride All

 <IfModule mod_dav.c>
  Dav off
 </IfModule>

 SetEnv HOME /var/www/html/nextcloud
 SetEnv HTTP_HOME /var/www/html/nextcloud

</Directory>
Step 4: Setting Apache and SELinux
In this step we’ll start (and enable) the webserver and we’ll set SELinux up. Now, many tutorials will tell you to disable SELinux (because it is a difficult component to manage). Instead, I suggest you to keep it on and add the rules for NextCloud:
# semanage fcontext -a -t httpd_sys_rw_content_t '/var/www/html/nextcloud/data(/.*)?'
# semanage fcontext -a -t httpd_sys_rw_content_t '/var/www/html/nextcloud/config(/.*)?'
# semanage fcontext -a -t httpd_sys_rw_content_t '/var/www/html/nextcloud/apps(/.*)?'
# semanage fcontext -a -t httpd_sys_rw_content_t '/var/www/html/nextcloud/.htaccess'
# semanage fcontext -a -t httpd_sys_rw_content_t '/var/www/html/nextcloud/.user.ini'
# restorecon -Rv '/var/www/html/nextcloud/'
If you decided to use a Mariadb/MySQL/PostgreSQL, you also need to allow apache to access it:
# setsebool -P httpd_can_network_connect_db 1
Now that you’ve configured SELinux let’s start and enable Apache:
CentOS 7
Start (and enable at boot) the service:
# systemctl start httpd
# systemctl enable httpd
Step 5: Configuring firewall
This step is essential when your firewall is enabled. If your firewall is enabled you won’t be able to access your NextCloud 12 instance; on the other hand if it isn’t enabled you shouldn’t have any problems and you can simply skip this step.
Tip!
Keep in mind having a firewall enabled is a good security practice and you should already have one enabled.
In order for the firewall to work, it must be enabled. This guide will not include this part. When you enable a firewall many things can go wrong, e.g. you’re using SSH, you enable the firewall and your connection is cut and can’t connect otherwise, hence you should carefully review the documentation from your distribution.
To open the ports needed by NextCloud 12 follow these steps:
FirewallDIPtables
FirewallD is a newer firewall used to simplify firewall management. If you’re using it you can simply do:
# firewall-cmd --add-service http --permanent
# firewall-cmd --add-service https --permanent
# firewall-cmd --reload
IPtables is an older firewall (still widely used), if you have disabled firewallD you can use IPtables directly.
# iptables -A INPUT -p tcp -m tcp --dport 80 -j ACCEPT
# iptables -A INPUT -p tcp -m tcp --dport 443 -j ACCEPT
Step 6: Install
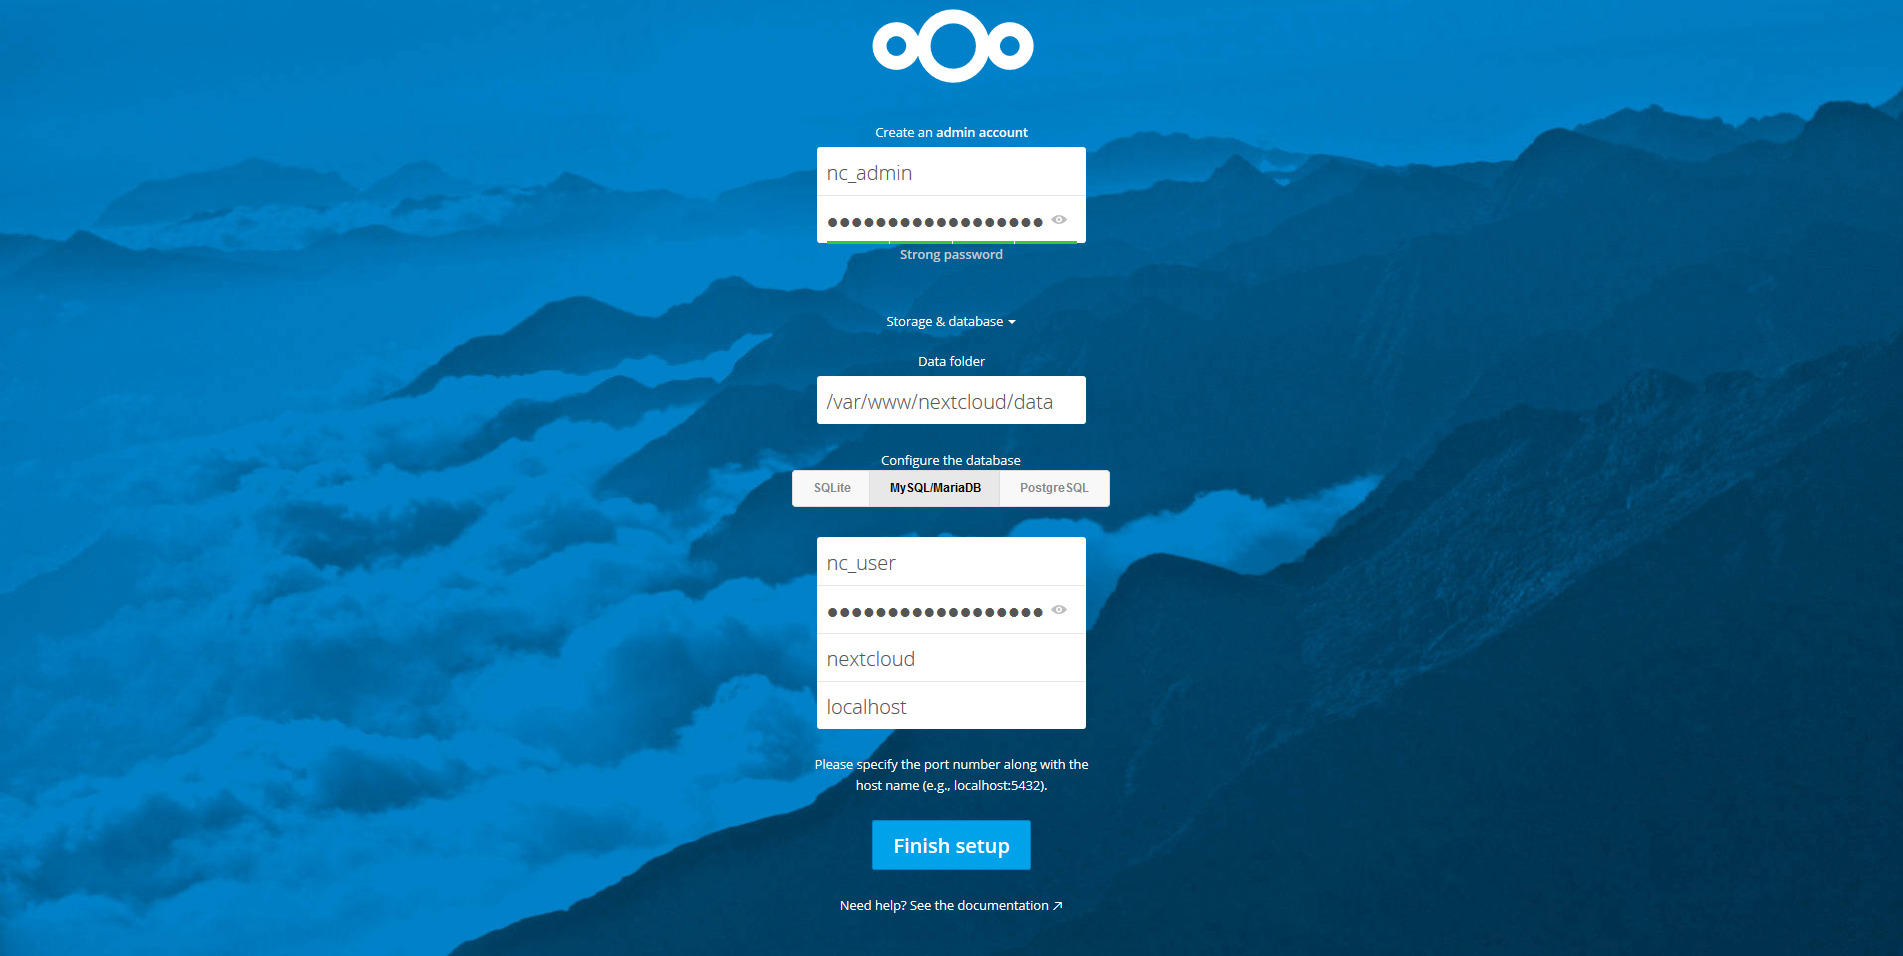
Once you’re done, it’s time to install everything. Head to http://YOUR_IP_ADDRESS/nextcloud/ and you will be facing the following screen:

Nextcloud 12 installation
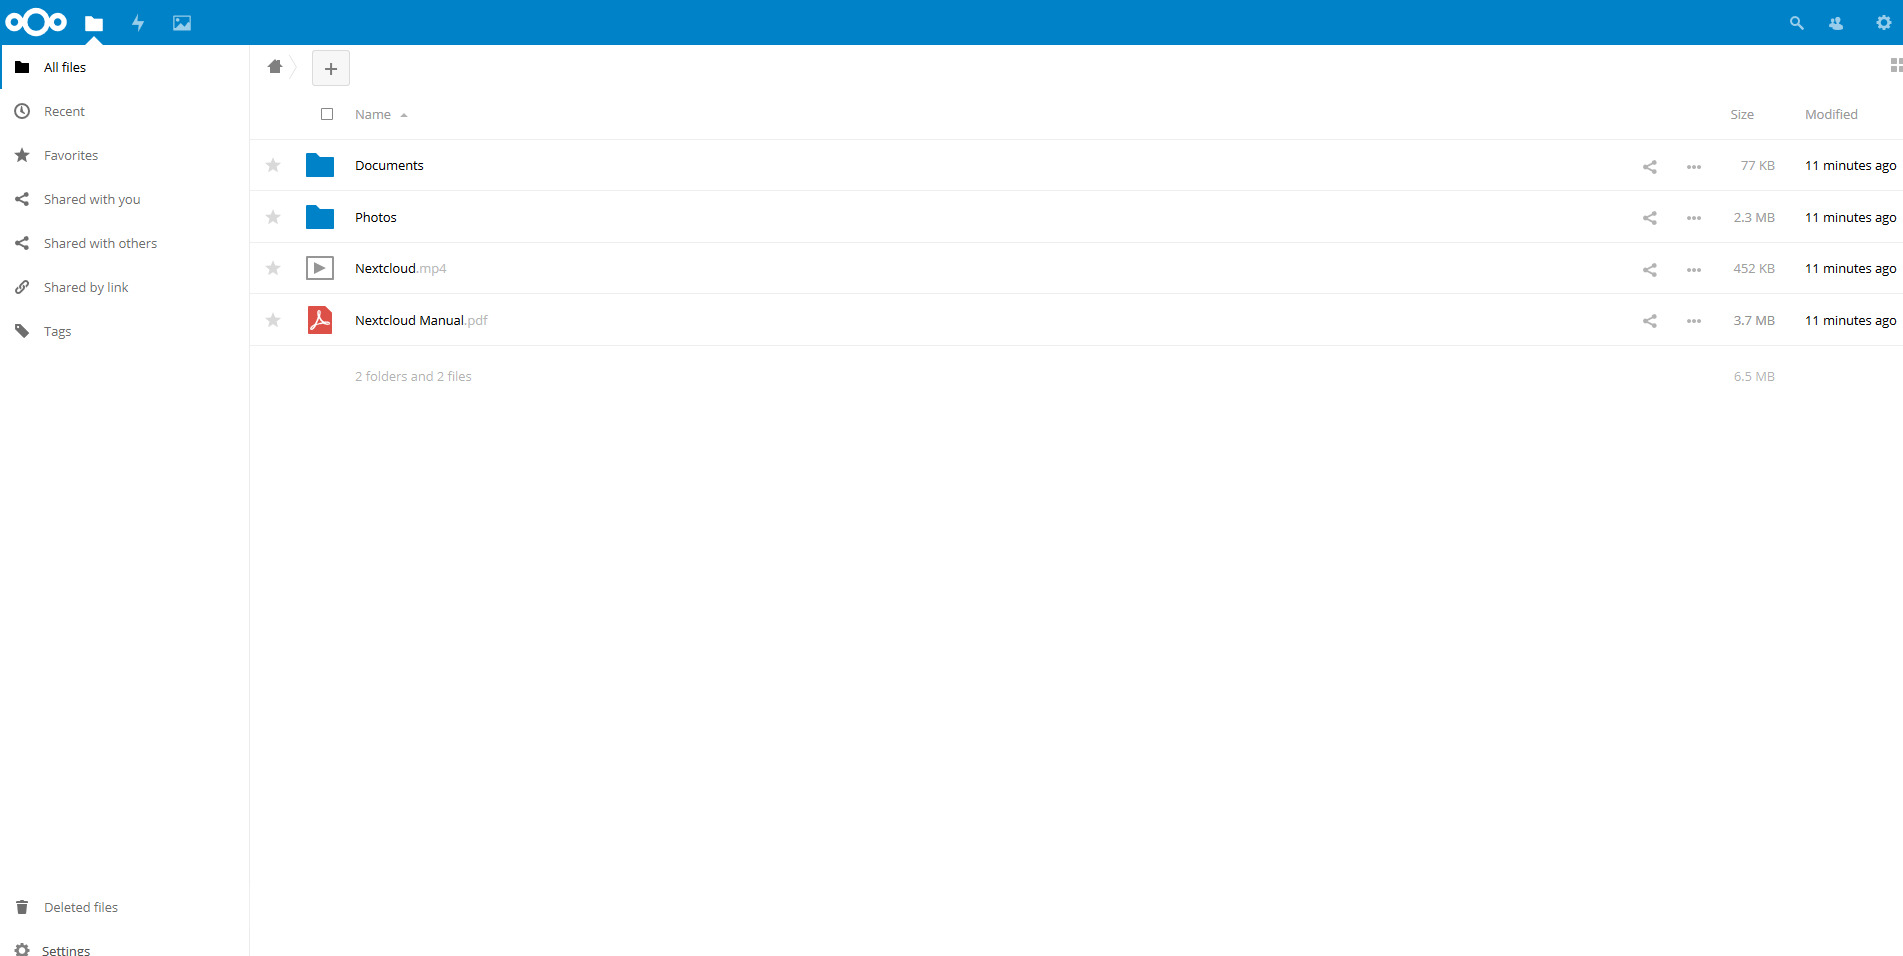
Select an administrator username and password. Then click on “Storage & Database“, here you can select the data folder, but if you don’t know what you’re doing it’s best if you leave it with the default value. Then select the database you chose during step 2. Fill everything and if you’ve followed all the steps correctly you should be seeing the Files app:
Nextcloud 12 Files App
The IT guy with a slight look of boredom in his eyes. Freelancer. Current interests: Kubernetes, Tensorflow, shiny new things.


Note: If you have a clean install of CentOS you need to install bzip2:
yum install bzip2
Hello Puff Face, thank you for your contribution, indeed bzip2 executable is missing on CentOS minimal install. In my test I usually use virtual machines templates so I overlooked this.
Mark, why don’t you list the commands for opening the firewall ports?
Hello Bernald, other users have asked me the same question and I will add the instructions to open the firewall as soon as possible in every Own/Nextcloud tutorial. Initially, I thought that instructing users on how to open firewall ports would be dangerous for newbies. Since I have received many many requests, I will be adding this part in the forthcoming review session.
Mark, thank you for this tutorial. Right at the beginning you mention installing Apache as the web server, but I do not see the instructions to do that. While that was no problem for me it might be for a newby, especially since the Apache package in CentOS and other RHEL-derived distros is not called apache but httpd:
yum -y install httpd
Hello Wolf (or is it Paul? I apologize in advance), thanks for the feedback. Indeed one needs to install apache, although it might seem part of the command, it is the first package in the second yum command in the 1st step, right before php70w.
It is Wolf, indeed …
I apologize, I missed that because I followed the link to the php71 tutorial and then assumed that I could ignore the php install instructions right below there. Thanks for pointing it out, because I would have missed some of the packages other than httpd.
Hello Wolf, you shouldn’t apologize at all : ) Quite the opposite, you just highlighted a logic flaw in the flow (pardon the pun) of my tutorial, thank you. In the next review of all next/owncloud tutorials due in a few weeks (hopefully), I will address this issue by clarifying what to do if you follow the 7.1 path. The 7.1 tutorial starts from the assumption the user should decide the web server and the interaction between the two (mod_php, php-fpm etc.) hence the incongruence.
Mark,
Thank you for this nice tutorial.
Any idea with Nextcloud+SELinux+Letsencrypt on CentOS 7 ?I couldn’t have my nextcloud-based website validated
Hello Muhammad, I’m glad you found my tutorial useful for installing your NextCloud instance. In order to make things work the first thing we need to do is isolate the cause. Are you really sure it is SELinux that’s blocking your certificate request? You can easily verify so by issuing
and performing the certificate request anew. If you’re successful it is indeed SELinux. If not it might be related to Certbot (I assume you’re using) and your web server (are you using Apache, Nginx?), which mode are you using, automated, certonly, webroot?
Thank you the tutorial. nice job :) I have a question about LDAP. How to enable LDAP on nextcloud. When I check the applicaton on nextcloud, LDAP is passive