NextCloud is a Dropbox-like solution for self-hosted file sharing and syncing. Installing NextCloud 18 on CentOS is quite simple. Whether you want to backup, have file-syncing or just have a Google Calendar alternative, this guide is for you.
What is NextCloud? Is it like a “cloud”?
If you stumbled here by chance and don’t know what NextCloud is, here is an article explaining its principal features and advantages/disadvantages. In this other article you can find NextCloud 18 new features. To tell you the truth, NextCloud is a SaaS cloud, if you want to know more about cloud types you can read this article.
In this article we will cover the installation of the server (not the client).
What’s the newest version?
The newest version of this tutorial is the following:
I take NO responsibility of what you do with your machine; use this tutorial as a guide and remember you can possibly cause data loss if you touch things carelessly.
The first step in order to install NextCloud 18 is to install a web server and PHP.
CentOS 7CentOS 8
Since CentOS 7 ships with PHP 5.4 by default but NextCloud 18 requires at least PHP 7 we’ll also be installing PHP 7 from a third-party repository. The following procedure will install apache as webserver. Input the commands one by one to avoid errors!
If you’d rather use PHP 7.3, you can follow this tutorial: how to install PHP 7.3 on CentOS 7. PHP 7.3 isn’t yet available in this repository.
Warning!
If you decided to use PHP 7.3 rather than PHP 7.2 using the past tutorial, replace each instance of php72w with php73w in all the successive commands.
This guide won’t help you install ImageMagick. NextCloud needs ImageMagick to generate image previews (it should still work, albeit not for SVGs). In CentOS 8 ImageMagick has been replaced by GraphicMagick, a fork of the former. Unfortunately, NextCloud is unable to use GraphicMagick and still needs ImageMagick. I have tried different ways to make it work and the only reliable way is to compile ImageMagick from source and install the pecl extension. Since I found it to be a cumbersome process that will someday be obsolete I have decided not to include it in this guide.
Now that you got the software, you need to choose a database that will support the installation. You have three choices:
SQLite: is a single-file database. It is suggested only for small installations since it will slow NextCloud down sensibly.
MariaDB/MySQL: are popular open source databases especially amongst web developers. It is the suggested choice.
PostgreSQL: a popular enterprise-class database. More complicated than MySQL/MariaDB.
Now, this choice won’t really alter the functionality of NextCloud (except if you use SQLite), so pick whatever you know best. If you’re unsure pick MariaDB/MySQL.
Now you need to create the user that will be used to connect to the database:
CREATE USER nc_user WITH PASSWORD 'YOUR_PASSWORD_HERE';
The last step is to grant the privileges to the new user:
GRANT ALL PRIVILEGES ON DATABASE nextcloud to nc_user;
When you’re done type \q and press enter to exit.
Warning!
You may experience difficulties in authenticating NextCloud with PostgreSQL since the local authentication method is set to ident by default. If you want to change it keep reading.
The configuration file for PostgreSQL is a file located in /var/lib/pgsql/data/pg_hba.conf . Open it with your favourite editor and look for the marked line (line 5):
# TYPE  DATABASE        USER            ADDRESS                 METHOD
# "local" is for Unix domain socket connections only
local   all             all                                     peer
# IPv4 local connections:
host    all             all             127.0.0.1/32            ident
# IPv6 local connections:
host    all             all             ::1/128                 ident
# Allow replication connections from localhost, by a user with the
# replication privilege.
#local   replication     postgres                                peer
#host    replication     postgres        127.0.0.1/32            ident
#host    replication     postgres        ::1/128                 ident
Replace ident with md5 on that line and restart PostgreSQL:
# systemctl restart postgresql
Step 3: Install NextCloud
This step involves getting the software and configure Apache to run it.
CentOS 7/8
With these step we download the software and extract it:
Now we need to create a new file in /etc/httpd/conf.d/nextcloud.conf . Feel free to use whatever editor you feel comfortable with and add the following lines:
Alias /nextcloud "/var/www/html/nextcloud/"

<Directory /var/www/html/nextcloud/>
  Options +FollowSymlinks
  AllowOverride All

 <IfModule mod_dav.c>
  Dav off
 </IfModule>

 SetEnv HOME /var/www/html/nextcloud
 SetEnv HTTP_HOME /var/www/html/nextcloud

</Directory>
Step 4: Setting Apache and SELinux
In this step we’ll start (and enable) the webserver and we’ll set SELinux up. Now, many tutorials will tell you to disable SELinux (because it is a difficult component to manage). Instead, I suggest you to keep it on and add the rules for NextCloud:
CentOS 7/8
# semanage fcontext -a -t httpd_sys_rw_content_t '/var/www/html/nextcloud/data(/.*)?'
# semanage fcontext -a -t httpd_sys_rw_content_t '/var/www/html/nextcloud/config(/.*)?'
# semanage fcontext -a -t httpd_sys_rw_content_t '/var/www/html/nextcloud/apps(/.*)?'
# semanage fcontext -a -t httpd_sys_rw_content_t '/var/www/html/nextcloud/3rdparty/aws/aws-sdk-php/src/data/logs(/.*)?'
# semanage fcontext -a -t httpd_sys_rw_content_t '/var/www/html/nextcloud/.htaccess'
# semanage fcontext -a -t httpd_sys_rw_content_t '/var/www/html/nextcloud/.user.ini'
# restorecon -Rv '/var/www/html/nextcloud/'
If you decided to use a Mariadb/MySQL/PostgreSQL, you also need to allow apache to access it:
# setsebool -P httpd_can_network_connect_db 1
In case you chose PostgreSQL you also need to enable httpd_execmem (I’m still investigating why this is needed):
# setsebool -P httpd_execmem 1
Another important thing to do is to raise PHP’s memory limit:
# sed -i '/^memory_limit =/s/=.*/= 512M/' /etc/php.ini
Now that you’ve configured SELinux let’s start and enable Apache:
# systemctl start httpd
# systemctl enable httpd
Step 5: Configuring firewall
This step is essential when your firewall is enabled. If your firewall is enabled you won’t be able to access your NextCloud 18 instance; on the other hand if it isn’t enabled you shouldn’t have any problems and you can simply skip this step.
Tip!
Keep in mind having a firewall enabled is a good security practice and you should already have one enabled.
In order for the firewall to work, it must be enabled. This guide will not include this part. When you enable a firewall many things can go wrong, e.g. you’re using SSH, you enable the firewall and your connection is cut and can’t connect otherwise, hence you should carefully review the documentation from your distribution.
To open the ports needed by NextCloud 18 follow these steps:
FirewallDIPtables
FirewallD is a newer firewall used to simplify firewall management. If you’re using it you can simply do:
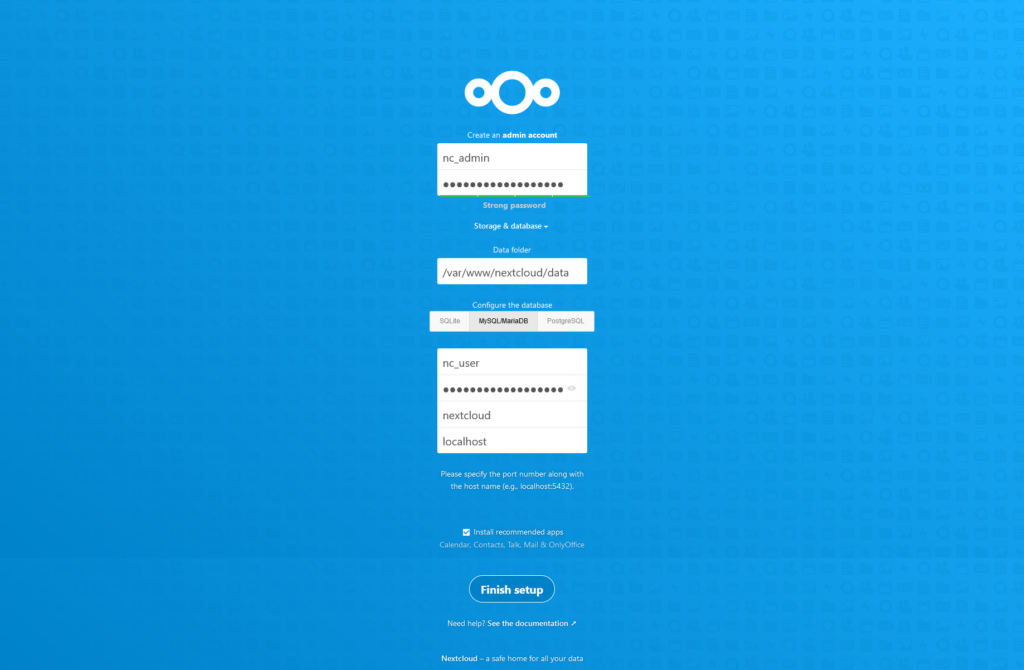
Once you’re done, it’s time to install everything. Head to http://YOUR_IP_ADDRESS/nextcloud/ and you will be facing the following screen:
NextCloud 18 installation
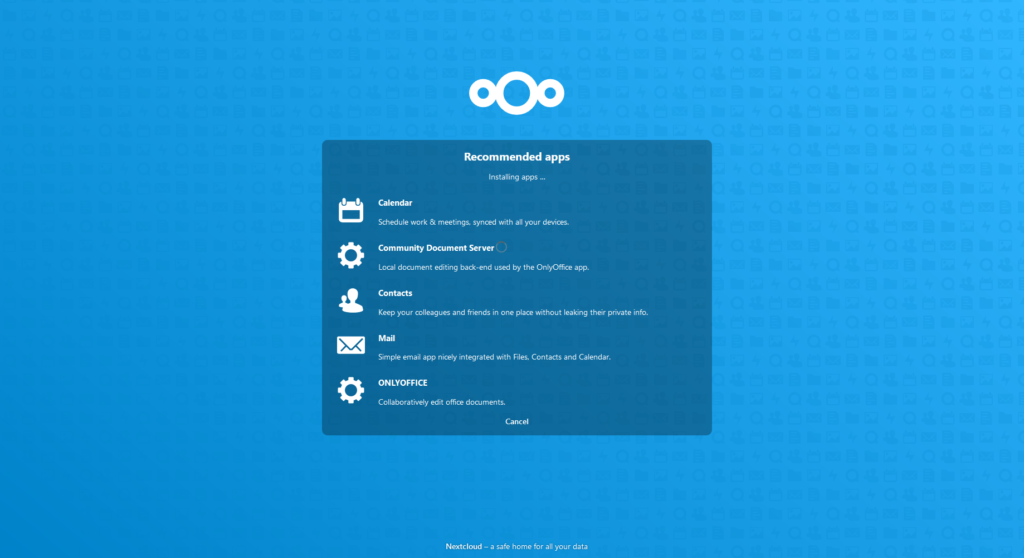
Select an administrator username and password. Then click on “Storage & Database“, here you can select the data folder, but if you don’t know what you’re doing it’s best if you leave it with the default value. Then select the database you chose during step 2. Fill everything and if you’ve followed all the steps correctly you should be seeing the following screen, after a short while you will be redirected to the second screen:
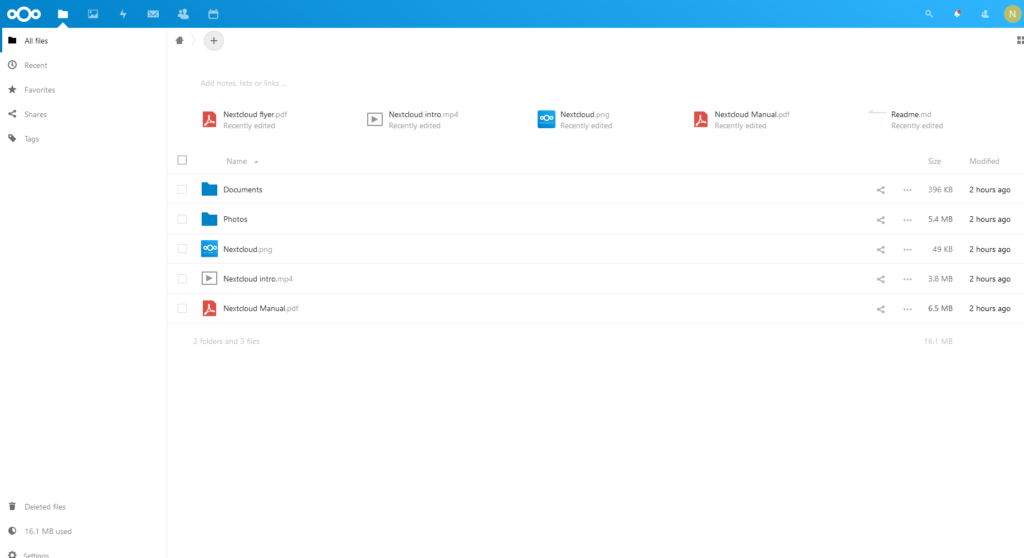
NextCloud 18 installing appsNextCloud 18 Files app
Step 7: Enable Caching (suggested)
NextCloud is good but it can be very slow if you don’t configure a caching solution. There are two caching solutions covered in this guide:
PHP OPcache: a PHP inbuilt cache solution that speeds up scripts execution.
Redis server: a fast in-memory key-value store that speeds up everything in NextCloud.
Enabling OPcache
CentOS 7/8
Open a terminal and input the following commands:
# yum install php-opcache
Now you need to edit a file located at /etc/php.d/10-opcache.ini . With your favorite editor, edit the file and make it look like this:
These values are suggested by NextCloud, but you’re free to tweak them to suit your needs. Once you’re done you can restart apache:
# systemctl restart httpd
Installing and configuring Redis
CentOS 7CentOS 8
Open a terminal and input the following commands:
# yum install redis php72w-pecl-redis
Now you must configure NextCloud to use Redis. To do so you need to edit the NextCloud configuration file located at /var/www/html/nextcloud/config/config.php . The file will look like this, add the highlighted lines:
These settings will enable NextCloud to use Redis for caching and file locks. Of course these settings are just an example, you can tweak them to suit your needs.
Now you need to modify (for some reason) the Redis port SELinux label in order to enable Apache to access Redis:
# semanage port -m -t http_port_t -p tcp 6379
Lastly, enable and start Redis and restart the webserver:
Now you must configure NextCloud to use Redis. To do so you need to edit the NextCloud configuration file located at /var/www/html/nextcloud/config/config.php . The file will look like this, add the highlighted lines:
These settings will enable NextCloud to use Redis for caching and file locks. Of course these settings are just an example, you can tweak them to suit your needs.
Lastly, enable and start Redis and restart the webserver:
Hosting applications available to the Internet is potentially dangerous. In order to keep your applications safe you need to be proficient in system security and to follow security best practices.
Most people will want to access their files from whatever location they are. To do so, your newly created NextCloud instance needs to be connected to the Internet.
Given that you need to take care of port-forwarding (if you’re a home user) and domain configuration (which varies according to your provider), here you can find the instructions to create a virtual host with Apache.
CentOS 7/8
Using your favorite text editor, edit the file we created previously at /etc/httpd/conf.d/nextcloud.conf . And make it look like this:
<VirtualHost *:80>
  ServerName YOURDOMAIN.TLD
  ServerAdmin [email protected]
  DocumentRoot /var/www/html/nextcloud

  <directory /var/www/html/nextcloud>
    Require all granted
    AllowOverride All
    Options FollowSymLinks MultiViews
    SetEnv HOME /var/www/html/nextcloud
    SetEnv HTTP_HOME /var/www/html/nextcloud
  </directory>
</VirtualHost>
It is important to set ServerName according to a domain you own and have configured correctly. Now you need to add YOURDOMAIN.TLD to the trusted domains in the NextCloud config file. You can do so with the following command:
Once you complete this step you won’t be able to access NextCloud through http://YOUR_IP_ADDRESS/nextcloud anymore. Instead you will be able to access it through http://YOURDOMAIN.TLD (notice /nextcloud is gone).
Lastly, restart the webserver:
# systemctl restart httpd
Step 9: Get a free SSL certificate with Let’s Encrypt! (SUGGESTED!
Now that you have your NextCloud instance up and running you’re good to go, but beware: you’re not safe. Internet is a dangerous place for your data and you will most likely need an SSL certificate to ensure your communications are encrypted. Provided you own a domain name you can get one for free using Let’s Encrypt! No catches, free forever.
Warning!
Let’s Encrypt has rate limits in place to prevent inappropriate usage of the CA. There’s a limit on the numbers of attempts you can do before getting a temporary ban. During this setup, if things go wrong, I suggest you to use the –staging option to avoid the temporary ban. The –staging option will use a testing server and will not issue valid certificates. When you have completed the procedure against the test server successfully, you can remove the –staging option to obtain the real certificate.
CentOS 7CentOS 8
Open a terminal and input the following commands:
# yum install certbot certbot-apache
Now you will run the command to install a certificate, follow the procedure and you will get everything configured out of the box:
$ sudo certbot --apache
Lastly, restart the webserver:
# systemctl restart httpd
If you need further help you can follow my other tutorial on Let’s Encrypt on CentOS (the apache part).
I’d like to install ldap on my Nextcloud 18 (CentOS 7). Would you be able to provide the necessary installation steps I would need to execute in order to be able to enable the ldap app in Nextcloud 18?
To be clear, I already have a domain setup on my lan. I want to be able to connect Nextcloud to my domain but the LDAP app on Nextcloud is disabled (greyed out). What would I need to install on CentOS 7 to enable this app on Nextcloud?
Hello greavette, as you have the directory up and running you have the most difficult point behind you, the reason you’re not allowed to enable the LDAP extension is probably because you’re missing the php-ldap package.
Thanks very much Mark for your reply. Very much appreciate you responding.
Would you be able to assist with what the command is to install php-ldap? I’m struggling to find the right command to use to install what I need for CentOS servers? I found posts related to the command needed for Ubuntu…but I’ve not found the right yum install command for CentOS 7.
We use cookies on our website to give you the most relevant experience by remembering your preferences and repeat visits. By clicking “Accept”, you consent to the use of ALL the cookies.
This website uses cookies to improve your experience while you navigate through the website. Out of these, the cookies that are categorized as necessary are stored on your browser as they are essential for the working of basic functionalities of the website. We also use third-party cookies that help us analyze and understand how you use this website. These cookies will be stored in your browser only with your consent. You also have the option to opt-out of these cookies. But opting out of some of these cookies may affect your browsing experience.
Necessary cookies are absolutely essential for the website to function properly. This category only includes cookies that ensures basic functionalities and security features of the website. These cookies do not store any personal information.
Functional cookies help to perform certain functionalities like sharing the content of the website on social media platforms, collect feedbacks, and other third-party features.
Performance cookies are used to understand and analyze the key performance indexes of the website which helps in delivering a better user experience for the visitors.
Cookie
Duration
Description
__smVID
1 month
Sumo sets this cookie for sign-up prompt purposes when visitors visit a website.
Analytical cookies are used to understand how visitors interact with the website. These cookies help provide information on metrics the number of visitors, bounce rate, traffic source, etc.
Cookie
Duration
Description
CONSENT
2 years
YouTube sets this cookie via embedded youtube-videos and registers anonymous statistical data.
_ga
2 years
The _ga cookie, installed by Google Analytics, calculates visitor, session and campaign data and also keeps track of site usage for the site's analytics report. The cookie stores information anonymously and assigns a randomly generated number to recognize unique visitors.
_gat_gtag_UA_60468161_1
past
Set by Google to distinguish users.
_ga_DR9SCJ09BV
2 years
This cookie is installed by Google Analytics.
_gid
1 day
Installed by Google Analytics, _gid cookie stores information on how visitors use a website, while also creating an analytics report of the website's performance. Some of the data that are collected include the number of visitors, their source, and the pages they visit anonymously.
__gads
1 year 24 days
The __gads cookie, set by Google, is stored under DoubleClick domain and tracks the number of times users see an advert, measures the success of the campaign and calculates its revenue. This cookie can only be read from the domain they are set on and will not track any data while browsing through other sites.
Advertisement cookies are used to provide visitors with relevant ads and marketing campaigns. These cookies track visitors across websites and collect information to provide customized ads.
Cookie
Duration
Description
edgebucket
session
Reddit sets this cookie to save the information about a log-on Reddit user, for the purpose of advertisement recommendations and updating the content.
IDE
1 year 24 days
Google DoubleClick IDE cookies are used to store information about how the user uses the website to present them with relevant ads and according to the user profile.
test_cookie
14 minutes
The test_cookie is set by doubleclick.net and is used to determine if the user's browser supports cookies.
VISITOR_INFO1_LIVE
5 months 27 days
A cookie set by YouTube to measure bandwidth that determines whether the user gets the new or old player interface.
YSC
session
YSC cookie is set by Youtube and is used to track the views of embedded videos on Youtube pages.
yt-remote-connected-devices
never
YouTube sets this cookie to store the video preferences of the user using embedded YouTube video.
yt-remote-device-id
never
YouTube sets this cookie to store the video preferences of the user using embedded YouTube video.
yt.innertube::nextId
never
This cookie, set by YouTube, registers a unique ID to store data on what videos from YouTube the user has seen.
yt.innertube::requests
never
This cookie, set by YouTube, registers a unique ID to store data on what videos from YouTube the user has seen.


Hello, Thanks for the tutoriel. However i steel have an error message while trying to open a docx file with OnlyOffice:
Community document server is not supported for this instance, please setup and configure an external document server
can’t execute x2t binary, ensure php can execute binaries in the app folder
Hi, thanks for the good job. After i installed redis i received Internal Server Error.But If i remove memcache line it woks. May you help me?
Hello and thank you for these instructions.
I’d like to install ldap on my Nextcloud 18 (CentOS 7). Would you be able to provide the necessary installation steps I would need to execute in order to be able to enable the ldap app in Nextcloud 18?
Thank you.
Hello,
To be clear, I already have a domain setup on my lan. I want to be able to connect Nextcloud to my domain but the LDAP app on Nextcloud is disabled (greyed out). What would I need to install on CentOS 7 to enable this app on Nextcloud?
Thank you.
Hello greavette, as you have the directory up and running you have the most difficult point behind you, the reason you’re not allowed to enable the LDAP extension is probably because you’re missing the php-ldap package.
Thanks very much Mark for your reply. Very much appreciate you responding.
Would you be able to assist with what the command is to install php-ldap? I’m struggling to find the right command to use to install what I need for CentOS servers? I found posts related to the command needed for Ubuntu…but I’ve not found the right yum install command for CentOS 7.
Thank you.
I think I found it!
yum install php72w-ldap.x86_64