A comprehensive guide to Docker Networking
Networking is hard. When physical networking evolved in virtual networking things became even harder if you hadn’t strong networking fundamentals. When containers stepped into the game, container networking was sure to show up and prove even harder. Today we’re going to take a look at Docker Networking, without all the hardships.
Docker Networking brief introduction
Containers are just lightweight virtual machines, but they’re not that different in terms of networking. Both containers and virtual machines need networking in order to communicate with the outside and/or among themselves. You don’t need to grasp complex networking concepts such as spanning-tree protocol or IPv6 to get started, but your life will be easier if you already know your way around networking fundamentals. I’ll also assume you already have Docker basics in mind.
Thankfully, when you install Docker there’s no need to worry about networking! The Docker Engine takes care of this complex piece of architecture out of the box. More specifically the Engine creates three networks automatically:
- Bridge: this is the default network for all containers, in new installations it is named docker0.
- Host: this network exactly matches the host network.
- None: this network is hardly a network, containers connected to it will only have a loopback interface.
Let’s get a closer look to each type of network, the none network is pretty self-explanatory.
Bridge networks
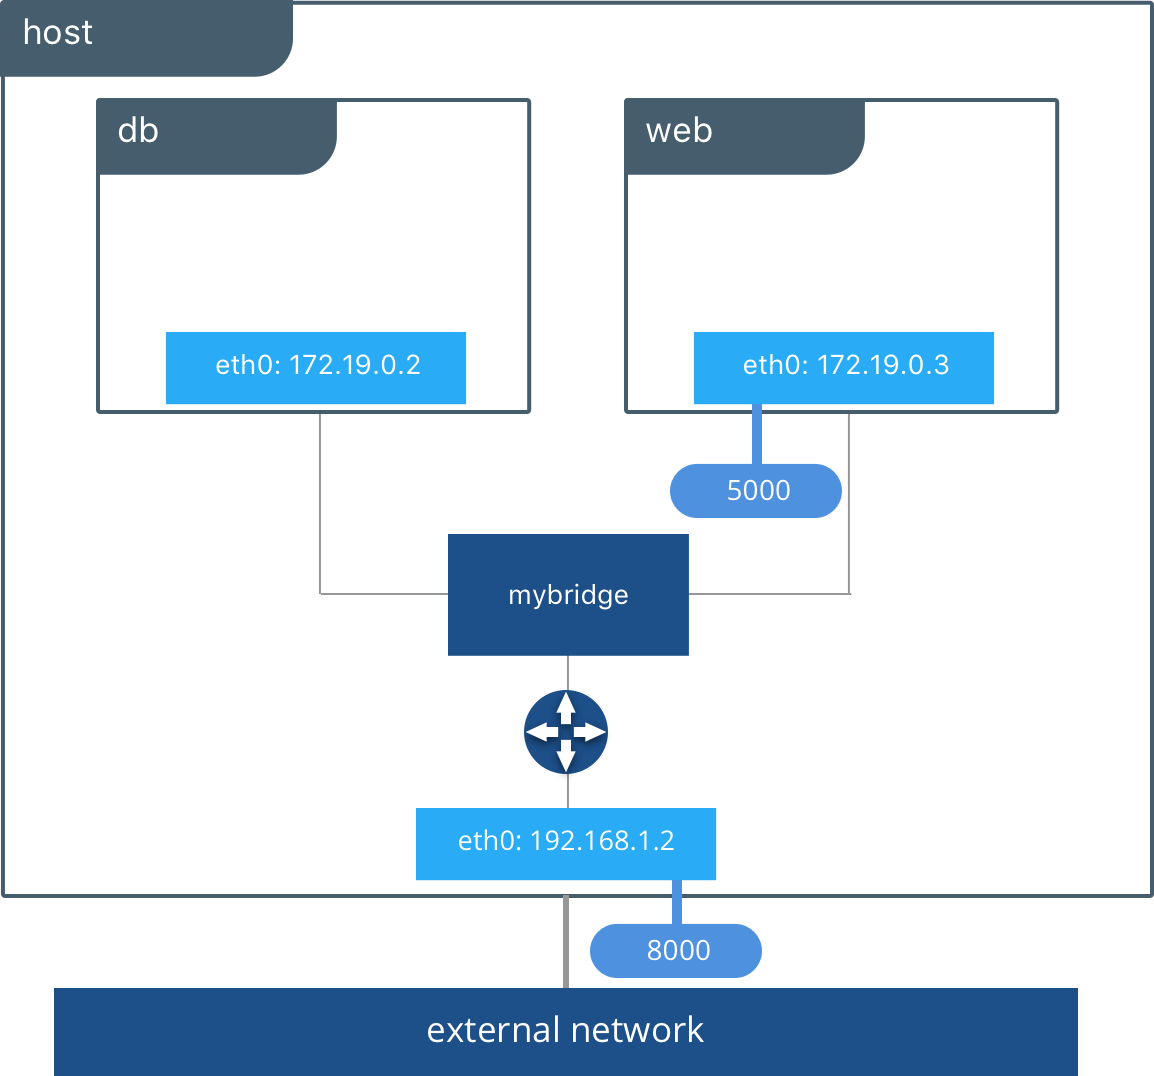
Docker Networking – Bridge network
You might be tricked to think this is a “bridged network”, but as a matter of fact it is pretty different. The bridge network is a standalone network with its own router (the Docker Engine). Each container attached to this type of network is assigned its own private IP address which is not reachable from the outside by default. When the container needs to request outer resources it sends packets through the default gateway (the Docker Engine) which in turn performs NAT/PAT to translate the request and route it through the configured networks on the host.
To access a container from the outside of the Docker Engine, you need to expose a port which closely resembles (they are essentially the same) port forwarding. This happens when you launch a container using this familiar parameter: -p 8080:80 . As an effect of the -p parameter enables you to access containerIP:80 with the IP of hostIP:8080. As you can see you’re using the host IP rather than the container, and the port on the host (8080 in this case) is bound to the port in the container (80 in this case) which is on the interface attached to the bridge network.
The default bridge network (docker0) also called “system bridge network” is the default network for every container if you don’t specify a network. Containers attached to docker0 can communicate by default using IP addresses, but they can’t communicate using Domain Names (DNS). Unless you use the –link parameter (which is deprecated) to bind a name to a container, there’s no native way to use DNS. This handy behavior can be obtained using user-defined bridge networks. As a matter of fact user-defined bridge networks will have a feature called automatic service discovery, this feature will allow containers to resolve names into IPs of other containers connected to the same network, much like a local DNS server.
As you can see you already use the bridge network, and know a tiny bit of how to use them (-p and –link). This network is the default one for standalone setups but it isn’t suited to multi-host (cluster) deployment.
Host networks
The host network is essentially a bridged network (notice the final d in bridged) as you know it in networking. Containers that belong to a host network share the networking stack with the host. This means a container exposing port 80 will automatically bind to hostIP:80 (without the need of -p). If the container has no port exposed using the host network is meaningless. The default name on new installation is host, but the driver type is null.
Macvlan networks
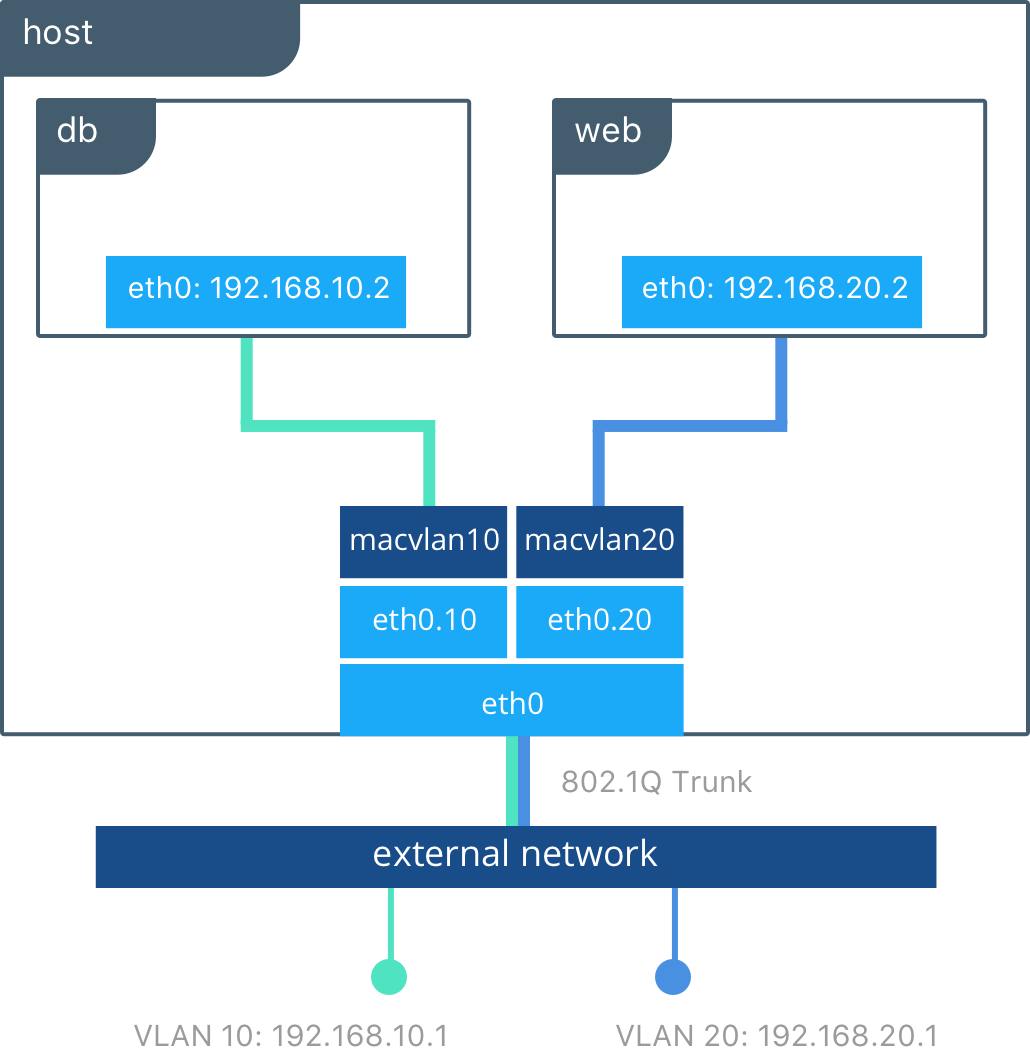
Docker Networking – Macvlan network
The Macvlan network is another bridged network (notice the final d in bridged) as you know it in networking. Containers connected to a Macvlan network will appear as physical devices on the physical network that is configured. This is probably the closest network type to the traditional virtual machine approach. Each container will have its own MAC address meaning it can get IP and DNS through DHCP and can communicate with other devices in that physical network.
This type of network is the ideal for containerizing legacy applications that need physical network access in order to communicate with other devices connected to the physical network. The Macvlan network requires the physical interface to support promiscuous mode in order to function.
The Macvlan network can be configured in two modes:
- Bridge mode: this is the default mode and its behavior is the one described in the precedent paragraphs.
- 802.1q trunk bridge mode: in this mode the Engine creates sub-interfaces using the 802.1q, also called dot1q, protocol. These interfaces use a network trunk and different VLANs to allow granular control over the communication. It is however a complex setup and you don’t need to be concerned with it.
Most of the times you won’t be using this network type, since it is intended for legacy applications/setups. The 802.1q setup is particularly complex and you don’t need to know how to set it up in order to work with Docker. Most of the times you will be using bridge or overlay network types.
Overlay networks
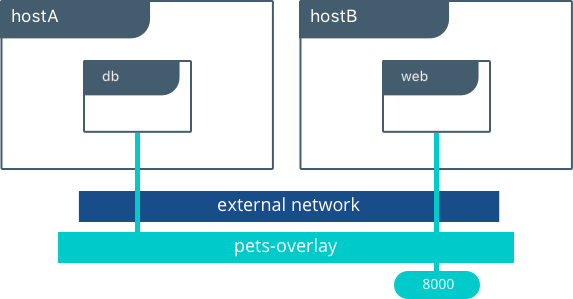
Docker Networking – Overlay network
The overlay network is a network that operates at cluster level rather than os level. This is the default solution when using Docker Swarm, and it completely replaces host networking by using VXLAN. The overlay network, as the name suggests, creates an overlay over multiple physical interfaces, it is a virtual network shared across multiple machines.
Each container connected to the overlay network will be able to communicate with other containers connected to that same overlay network even if they run on different hosts. As a matter of fact the limitation of the precedent network types was the issue that they could not run across multiple physical hosts. The overlay network type was born to allow this specific scenario.
Plugin networks
The Docker Networking stack (also known as Container Network Model) is modular and allows different type of native networks (Bridge, Macvlan, Host) as well as other network defined by third party plugins. As of the writing of this article there are only a few network plugins since the existing network types cover most needs for networking and others solutions such as Kubernetes have their own way of managing networking.
Managing the Docker Networking stack
Now that you know the different type of networks available in Docker let’s take a closer look at how to manage them. Apart from the creation of a network the commands are the same. Examples are taken from the official documentation.
Listing networks
$ docker network ls

NETWORK ID          NAME                DRIVER              SCOPE
17e324f45964        bridge              bridge              local
6ed54d316334        host                host                local
7092879f2cc8        none                null                local
Inspecting a network
$ docker network inspect bridge

[
    {
        "Name": "bridge",
        "Id": "17e324f459648a9baaea32b248d3884da102dde19396c25b30ec800068ce6b10",
        "Created": "2017-06-22T20:27:43.826654485Z",
        "Scope": "local",
        "Driver": "bridge",
        "EnableIPv6": false,
        "IPAM": {
            "Driver": "default",
            "Options": null,
            "Config": [
                {
                    "Subnet": "172.17.0.0/16",
                    "Gateway": "172.17.0.1"
                }
            ]
        },
        "Internal": false,
        "Attachable": false,
        "Containers": {
            "602dbf1edc81813304b6cf0a647e65333dc6fe6ee6ed572dc0f686a3307c6a2c": {
                "Name": "alpine2",
                "EndpointID": "03b6aafb7ca4d7e531e292901b43719c0e34cc7eef565b38a6bf84acf50f38cd",
                "MacAddress": "02:42:ac:11:00:03",
                "IPv4Address": "172.17.0.3/16",
                "IPv6Address": ""
            },
            "da33b7aa74b0bf3bda3ebd502d404320ca112a268aafe05b4851d1e3312ed168": {
                "Name": "alpine1",
                "EndpointID": "46c044a645d6afc42ddd7857d19e9dcfb89ad790afb5c239a35ac0af5e8a5bc5",
                "MacAddress": "02:42:ac:11:00:02",
                "IPv4Address": "172.17.0.2/16",
                "IPv6Address": ""
            }
        },
        "Options": {
            "com.docker.network.bridge.default_bridge": "true",
            "com.docker.network.bridge.enable_icc": "true",
            "com.docker.network.bridge.enable_ip_masquerade": "true",
            "com.docker.network.bridge.host_binding_ipv4": "0.0.0.0",
            "com.docker.network.bridge.name": "docker0",
            "com.docker.network.driver.mtu": "1500"
        },
        "Labels": {}
    }
]
Starting a container on a specific network
Simply add the –network parameter to the run command:
$ docker run -dit --name alpine1 --network my-network alpine ash
Creating a bridge network
$ docker network create --driver bridge my-network
Creating a Macvlan network (bridge mode without 802.1q)
$ docker network create -d macvlan \
  --subnet=172.16.86.0/24 \
  --gateway=172.16.86.1  \
  -o parent=eth0 pub_net
Of course you should replace your subnet, gateway and parent (physical interface) accordingly.
Removing a network
$ docker network rm my-network
- 2020 A year in review for Marksei.com - 30 December 2020
- Red Hat pulls the kill switch on CentOS - 16 December 2020
- OpenZFS 2.0 released: unified ZFS for Linux and BSD - 9 December 2020


Recent Comments